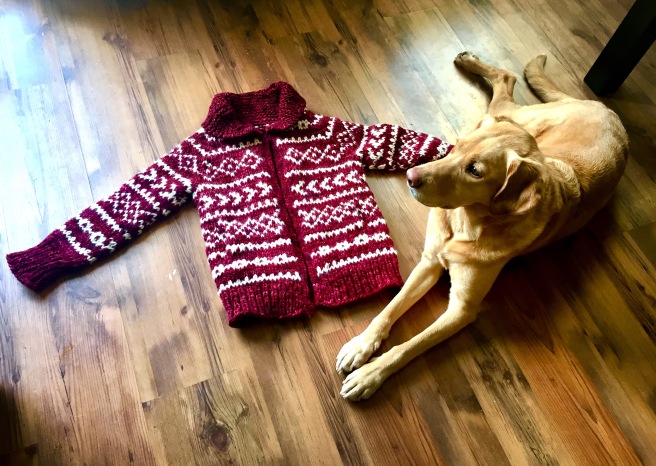
Last week I started the Beagle pullover for Cory, and so far I absolutely love the pattern. It has really classic but rugged texture achieved through simple twisted-stitch ribbing and a double seed stitch yoke. I’m finding it very relaxing to be able to sit at home in the evenings and knit a piece that looks complex, but actually requires very little concentration. Now that I’m back to work full-time(ish), it’s nice to be able to unwind in front of the TV while knitting and not have to glance over at a cable chart every other row. Up to this point, I’ve kept true to the pattern except for one little modification: I used tubular cast-on for the ribbed cuff.
When it comes to sweaters, I’m a big fan of tubular cast-on. It’s great for other projects too (like mittens or toques), but it really elevates a sweater to the next level. When you dedicate so much of your time and effort and patience to a hand made garment, it just makes sense to pay attention to the little details that will give your hard work that je ne sais quoi. There are a variety of different ways of casting-on, and it’s important to use the right one for the right project. So then, why ever would we want to use tubular cast on over other methods?
WHAT IS TUBULAR CAST-ON? AND WHY USE IT?
When I first came across a pattern that called for tubular cast-on, it seemed really daunting. What made it so special? My usual cast-on had always served me well; why was I going to waste my time with scrap yarn, increases, rearranging stitches, and working NINE WHOLE ROWS before I could even begin knitting the actual pattern? It seemed like it was overcomplicating things for no apparent reason. I was wrong. It was well worth my time to follow, step-by-step, and add this new skill to my repertoire.
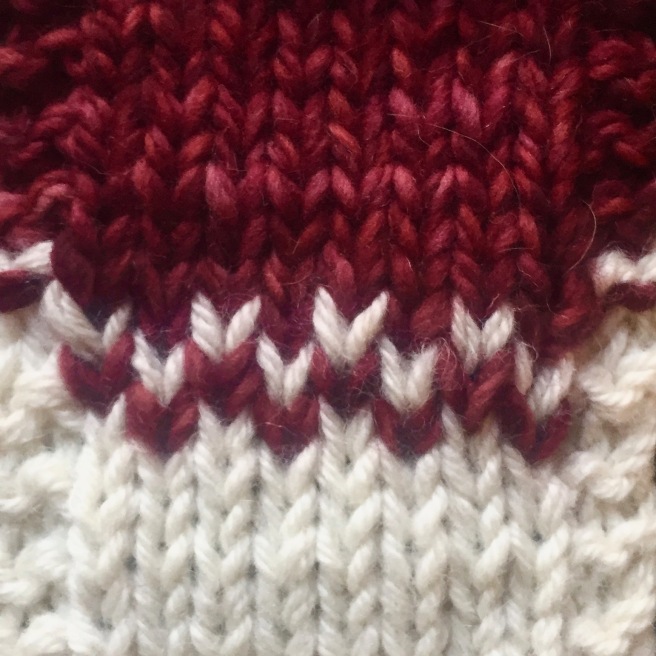
Tubular cast-on enables you to create a rounded edge in 1×1 or 2×2 rib. You achieve the roundedness by using the double-knitting** technique to literally knit a tube – hence the name. The result looks very clean and professional because you can’t easily identify a cast-on row.

The edge is established in ribbing from the get-go, making it the perfect choice for a strong and sturdy yet very stretchy ribbed cuff. In contrast, some of the more common ways of casting-on (i.e.: Knitted, Long-Tail, Cable) result in either a) flaring at the base of 1×1 ribbing; or b) the fabric appearing ruffled at the base of 2×2 ribbing. Not to mention, those methods are nowhere near as elastic as the tubular method is. Oh, and you can use it for casting-on in the round, too!
Have you’ve ever glanced at instructions on how to cast-on tubularly and thought it looked way too complex to attempt at the moment? Maybe you plan on trying it out someday, but get turned off by how many steps are involved. I was in that position once, but I highly recommend taking the time to try it out. It may not be a technique you use every time you start a project, but I guarantee that when you do use it, you will be very pleased with the results.
MATERIALS
- one set of straight or circular needles in size required for pattern
- one set of straight or circular needles a size smaller than required for pattern (optional)
- a length of scrap yarn
- yarn required for pattern
- crochet hook (optional)
- cable needle or DPN (if working 2×2 ribbing)
- scissors (optional)
A Note About Materials
Needles: Because tubular cast-on creates a double layer of fabric, you may opt to go down one needle size so that it does not become too bulky. This applies particularly to projects knitted on larger needles with thicker yarn. However, I always use a needle size smaller regardless of gauge.
Circular needles are necessary only if you are going to be knitting in 2×2 ribbing, but they are my needle-of-choice on every project.
Yarn: When choosing your scrap yarn, try to select something that is fairly smooth, such as cotton. This makes it easier to remove later. If your scrap yarn is fuzzy, the fibres can get entangled with the project yarn, making it hard to pull out and leaving behind lint. Also choose a strong contrasting colour so that it is very noticeable and easy to see as you remove it.

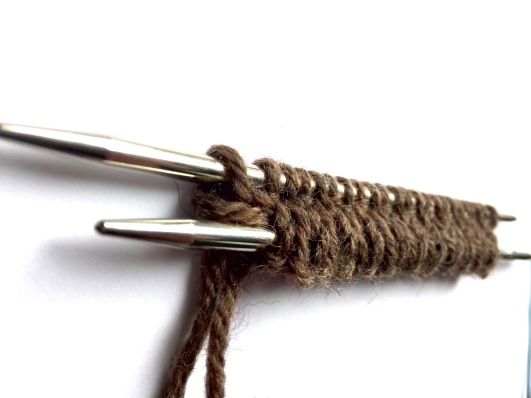
HOW TO TUBULAR CAST-ON
Row 1: Scrap Yarn CO
With your smaller needles and scrap yarn, use your preferred method to CO half the number of stitches + 1 extra stitch
For Example: I want to end up with 24 stitches in my ribbed cuff, so I divide it by 2, then add 1.
24÷2=12
12+1=13
Therefore, I use my scrap yarn to CO 13 stitches onto my smaller needles.
Note: My preferred method in this case is Provisional (Crochet) Cast-On because it is easy to remove afterwards. You can, however, use your favourite CO, though it may be more difficult and time-consuming to remove the waste yarn at the end.

Row 2 (WS): Foundation Row
With your project yarn, purl across entire row, directly into the scrap yarn

Row 3 (RS): Increase Row
K1, insert L needle from front to back into the strand that runs between the stitch you just worked and the next stitch on the L needle, then P that stitch. Repeat across until 2 stitches remain. K1, insert L needle from front to back into the strand that runs between the stitch you just worked and the last stitch on the L needle, then P that stitch together with the last stitch on L needle.


Row 4 (WS): Tubular Row
K1, bring yarn to front, Sl1P. Repeat across row
In other words, knit the knit stitches, and slip the purl stitches purlwise with yarn in front.

Row 5 (RS): Tubular Row
Repeat Row 4
Row 6 (WS): Tubular row
Repeat Row 4
Note: Up to this point, you have been working in 1×1 ribbing. If you want to continue in 1×1 ribbing, repeat the Tubular Row twice more then skip ahead to Final Step

Row 7 (RS): Rearrange for 2×2 Ribbing
Note: This row is an unworked row. Leave working yarn at right edge. Rearranging stitches requires a cable needle (CN)
Slip 1 (this should be a knit stitch), *slip next stitch (purl stitch) onto CN and hold in back of work, slip next stitch from L needle (knit stitch) onto R needle, slip stitch from cable needle onto right needle, slip next 2 stitches from L needle onto R needle (purl stitch followed by knit stitch). Repeat from * across to last 3 stitches, slip next stitch (purl stitch) onto CN and hold in back of work slip next stitch from L needle (knit stitch) onto R needle, slip stitch from CN onto right needle, slip last stitch (purl stitch)


All your stitches should be rearranged such that there are now 2 knit stitches side by side, followed by two purl stitches side by side.
Slide all the stitches across circular needle so that working yarn is once again at the tip of L needle
Note: All stitches are slipped purlwise
Row 8 (RS): 2×2 Tubular Row
As you did in the original tubular rows, knit the knit stitches, bring yarn to the front and slip the purl stitches purlwise
Row 9 (WS): 2×2 Tubular Row
Repeat Row 8
Final Step: Remove Scrap Yarn
Although you can remove the scrap yarn earlier, it is best to wait until you’ve established a few rows so that there is a bit of rigidity to your fabric and so that your stitches don’t get tangled.
Because I used the Provisional Cast-On, it is easy to simply tug at the waste yarn and undo the chain, leaving a single strand of waste yarn inside the “tube” of fabric I created. Give that strand a tug as well and voilà! scrap yarn is gone.


If you used a different cast-on for your scrap yarn, you may need to cautiously clip it out with scissors.
Now you are finally FREE to switch to your larger needles and start knitting your work according to the pattern directions! Whew! I know, I know. It’s a lot of work. Trust me, it’s totally worth it. There won’t be many people (except, perhaps, other knitters) who will notice the effort you put into such a seemingly minor detail, but it will definitely take your knitwear up a notch.

To recap, here is a summary of the steps involved in tubular cast on. Once you get the hang of it, it becomes much less intense.
- CO with Scrap yarn
- (WS) P across
- (RS) Increase
- (WS) 1×1 Tubular Row
- (RS) 1×1 Tubular Row
- (WS) 1×1 Tubular Row
- (RS) Rearrange
- (RS) 2×2 Tubular Row
- (WS) 2×2 Tubular Row
There are different ways of working a tubular cast-on. This is just the way I do it. Check out the Long Tail Tubular Cast-On tutorial by Ysolda for a completely different take on it.
Let me know if you have any questions or if you notice any errors. Good luck!
**Double knitting is a technique in which you alternate knit stitches and slipped purl stitches in order to create a two-sided fabric.